
Building a Booking System for a WordPress Site: A Step-by-Step Guide by FluxCMS
Building a booking system for your WordPress site is an essential step for many service-based businesses, like Siren Training, which offers Mental Health First Aid Courses, Neurodiversity Training for Workplaces, and Wellbeing Workshops. A smooth booking system can make a significant difference, making it easier for clients to book courses and for staff to manage schedules. For medium-sized companies like Siren Training, we at FluxCMS recommend choosing an easy-to-use solution that balances simplicity and scalability.
In this guide, we’ll walk through the process of creating a booking system, offering steps that even those new to WordPress can follow. From selecting the right plugin to customizing the booking experience, you’ll be ready to implement a solution that fits your business needs.
1. Planning the Booking System
Before jumping into the technical details, it’s important to step back and think about what you need from the booking system. This might seem like an obvious step, but it can save a lot of headaches down the road.
For Siren Training, for example, the system needs to handle bookings for different types of courses such as workshops, group training, or one-on-one consultations. The system should also allow customers to book different time slots and, ideally, offer a payment option for convenience.
Key Considerations
When planning your booking system, consider a few key questions:
- What services need to be booked? Are there different categories, like Mental Health First Aid versus Wellbeing Workshops?
- How will availability be managed? Will you need to set up different time slots or schedules for various instructors?
- How should payments be handled? Will you allow online payments upfront, or will clients pay at the time of the service?
Once you have a clear idea of what you need, it’s easier to narrow down your choices and set up the right system.
2. Selecting the Right Plugin
Now that you have a plan, it’s time to choose the right tool for the job. For WordPress, the easiest route is using a booking plugin. Plugins do all the heavy lifting, and the good news is that there are many options that can handle everything from simple appointment scheduling to complex, multi-service bookings.
Recommended Plugins
For Siren Training, which offers a variety of courses, we recommend a plugin that can handle both group bookings and one-on-one sessions. Here are three solid options to consider:
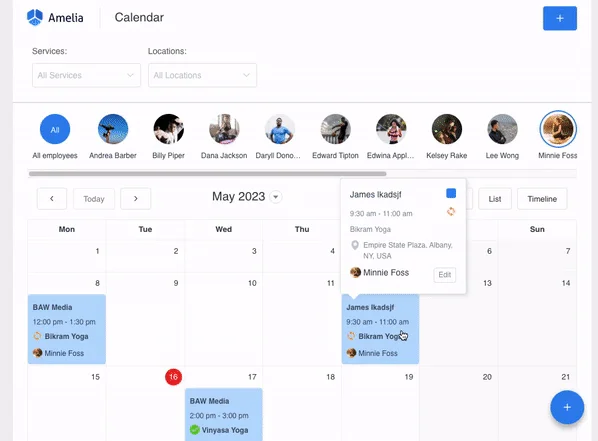
- Amelia: This is an excellent plugin for businesses like Siren Training. It’s easy to use, visually clean, and it allows for setting up multiple services, locations, and staff members. Plus, it integrates with payment systems and syncs with Google Calendar.
- Bookly: Another flexible option. It’s highly customizable, allowing for different booking forms, multiple service types, and online payments. It’s great for a growing company that might need more advanced features down the line.
- WooCommerce Bookings: If you’re already using WooCommerce to sell products or services on your site, this plugin integrates seamlessly with your existing store. It’s more focused on product-based bookings, which could work if Siren Training starts selling additional services or products like training materials.
Features to Look For
Whichever plugin you choose, make sure it ticks these boxes:
- Easy to Use: Both customers and staff need to be able to use the system without hassle.
- Mobile-Friendly: Many users will book through their phones, so a mobile-responsive interface is essential.
- Calendar Syncing: Syncing with Google Calendar or other calendars ensures that availability stays up-to-date, which is especially useful for companies managing multiple trainers.
- Payment Integration: Offering online payment through PayPal, Stripe, or other gateways can streamline the entire booking process.
3. Installing and Configuring the Plugin
Once you’ve selected the right plugin, the next step is to install and configure it to match your business needs. We’ll use Amelia as an example since it’s one of the more popular and easy-to-use options.
Installing the Plugin
Installing a WordPress plugin is straightforward. After logging into your WordPress dashboard, head over to the “Plugins” section. Click “Add New” and type the plugin name (in this case, Amelia) in the search bar. Once you’ve found it, click “Install” and then “Activate.” It’s that simple.
After activation, you’ll see a new section on your WordPress dashboard specifically for managing the booking plugin. This is where you’ll handle the configuration.
Basic Setup
The initial setup requires you to input some basic information, like your company’s name, time zone, and default currency. From there, you can set your business hours, define break times, and input public holidays or any days when services won’t be available.
For Siren Training, you’ll also want to set different working hours for your trainers and workshops. This ensures the booking system reflects the real availability of each service, preventing double bookings or scheduling conflicts.
Customizing the Booking Form
One of the most important steps is customizing the booking form to fit Siren Training’s specific needs. Amelia and most other booking plugins let you tweak the fields and options that appear on your booking form.
For example, you can add fields like:
- Course Selection: Let users choose between Mental Health First Aid, Neurodiversity Training, or Wellbeing Workshops.
- Preferred Trainer: If your company offers bookings with specific trainers, this field can give clients more control over their experience.
- Additional Information: Use this for anything extra the client might need to provide, such as special requirements for the training session.
4. Adding and Configuring Services
Now it’s time to set up the actual services that Siren Training offers, whether it’s a one-hour Neurodiversity Workshop or a full-day Mental Health First Aid course. The plugin allows you to create separate services and organize them in a way that makes sense for both your clients and your business.
Creating Services
In Amelia, go to the “Services” section and click “Add Service.” Here, you can create a new service for each course Siren Training offers. You’ll need to provide a description, set the duration (e.g., a two-hour workshop), and define the price. Each service can have its own settings, so you can easily manage different courses and workshops.
For example:
- Mental Health First Aid Course: 4 hours, $100 per person.
- Neurodiversity Training: 2 hours, $75 per person.
- Wellbeing Workshops: 1.5 hours, $50 per person.
You can also add categories to organize your services. This is helpful if you offer a variety of courses and want to keep everything easy to navigate.
Setting Staff Availability
Next, you’ll need to set availability for each trainer or staff member. In the “Employees” section of Amelia, you can add staff profiles and assign them to specific services. For example, one trainer might specialize in Neurodiversity Training, while another handles Mental Health First Aid.
Each staff member’s profile will also include their working hours, days off, and any breaks. This ensures that the booking system only shows available time slots that match their real schedule. You can also assign staff to specific services, meaning one trainer might only be bookable for certain types of training.
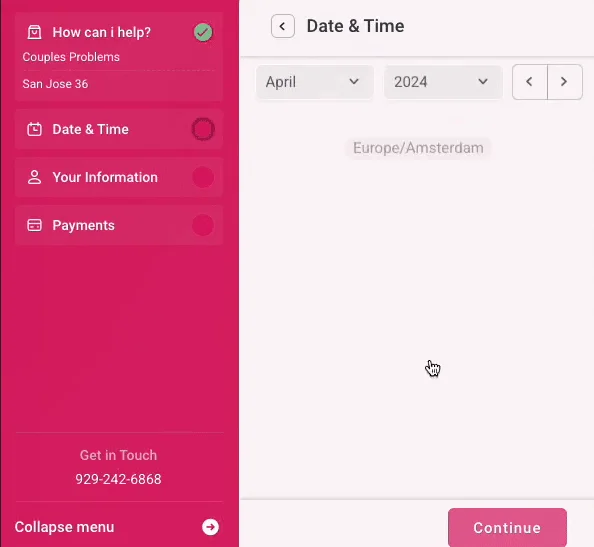
5. Creating a Booking Page
Once your services and staff are configured, the next step is to create a user-friendly booking page where clients can easily schedule their courses. This is where the booking system really comes to life.
Integrating the Booking Form into a Page
Creating a dedicated booking page on WordPress is simple. Here’s how you can do it:
- Create a New Page: From your WordPress dashboard, navigate to “Pages” and click “Add New.” This will be the page where your clients will land when they’re ready to book a service.
- Add a Title: Choose a clear, straightforward title for the page. Something like “Book Your Training” or “Schedule a Course” works well, as it tells visitors exactly what to expect.
- Insert the Booking Form: Most booking plugins, including Amelia, provide a shortcode that you can easily insert into the page to display the booking form. In Amelia, you can copy the shortcode (e.g.,
[amelia_booking]) and paste it directly into the WordPress editor.
If you’re using the block editor (Gutenberg), Amelia also offers a block specifically designed for this. Simply click the “+” icon to add a block, search for “Amelia,” and insert the booking form.
- Publish the Page: After adding the booking form, hit “Publish,” and you now have a live booking page on your site!
Customizing the Booking Page
For Siren Training, the booking page should be as simple and intuitive as possible. You might want to include some brief descriptions of each service at the top of the page or any important information clients need to know before booking (such as preparation tips for a Mental Health First Aid Course).
If needed, you can use a few CSS tweaks to customize the look and feel of the booking form so that it matches your site’s branding. However, most premium booking plugins are designed to blend in seamlessly with your existing WordPress theme, making this optional.
6. Setting Up Payment Integrations
For many businesses, including Siren Training, allowing clients to pay online when booking a course is a huge convenience. This also helps reduce no-shows since people are more likely to commit to an appointment if they’ve already paid for it.
Enabling Online Payments
The booking plugin you choose will likely offer integrations with major payment gateways like PayPal, Stripe, or WooCommerce Payments. For example, Amelia makes it very straightforward to connect to payment providers, allowing clients to pay for their bookings directly on your site.
To enable payments in Amelia, follow these steps:
- Go to Amelia > Settings > Payments.
- Choose the payment method you’d like to enable (PayPal or Stripe are commonly supported).
- Add your payment credentials (API keys or account details) so the plugin can process transactions.
Once this is set up, clients will be prompted to pay during the booking process. You can also offer flexibility by allowing different payment methods, such as full payment upfront or deposits, depending on what suits your business model.
Testing the Payment Process
Before going live, it’s crucial to run a few test transactions to ensure that payments are being processed smoothly. Make a dummy booking, go through the payment process, and check that everything works as expected.
Additionally, test how receipts and payment confirmations are sent to both you and the client. This small step helps you catch any issues before your customers experience them.
7. Calendar Synchronization and Appointments Management
One of the best features of many WordPress booking plugins is their ability to sync with calendars. This keeps everyone on the same page, literally, by ensuring that trainers’ schedules and availability are always up to date.
Syncing with Google Calendar
If Siren Training’s staff already uses Google Calendar or another calendar system, syncing the booking system with these calendars is a huge time saver.
In Amelia, for example, you can sync each trainer’s calendar with their availability. This means when a new booking is made, it will automatically appear in their Google Calendar, and any updates to their personal calendar (like marking days off) will reflect in the booking system.
Here’s how to set up Google Calendar sync in Amelia:
- Go to Settings > Integrations and select Google Calendar.
- Connect the calendar using your Google credentials, and assign each staff member their own Google account.
Now, the booking system will automatically update whenever an appointment is made, changed, or canceled, reducing the risk of double-booking or miscommunication.
Managing Appointments
The booking plugin also provides a centralized way to manage all bookings. In the plugin’s dashboard, you can view a calendar or list of upcoming appointments, reschedule or cancel bookings, and even send follow-up notifications.
For Siren Training, this makes it easy to see at a glance which trainers are booked on which days and adjust schedules as needed. This central management helps streamline operations, especially when dealing with multiple courses, staff members, and time slots.
8. Email and SMS Notification Setup
Communication with clients doesn’t end once they’ve booked a service. Automated notifications are a great way to keep clients informed and reduce no-shows by sending reminders ahead of time.
Configuring Automated Notifications
Most booking plugins, including Amelia and Bookly, offer built-in email and SMS notification systems. You can customize these notifications to reflect your brand’s tone and provide all necessary details regarding the booking.
For example, when someone books a Mental Health First Aid course at Siren Training, you can send them a confirmation email right away, followed by a reminder email a day before the course. You can even include important details like the location, what to bring, and a cancellation policy.
In Amelia:
- Go to Notifications in the settings menu.
- Customize the email templates, including the subject lines and body text.
If your plugin supports it, you can also set up SMS notifications. These are particularly effective for reducing no-shows, as most people are more likely to see a text reminder than an email.
Testing Notifications
Again, testing is crucial before going live. Make a test booking and check that both you and the client receive the right notifications at the right times. This step ensures that everything is set up correctly and that the information sent to customers is accurate and professional.
9. Testing and Launching the Booking System
At this point, most of the technical work is done. However, before rolling out the new booking system to all of Siren Training’s clients, it’s essential to do a thorough test run.
Testing the System
Go through the booking process just as a client would. Test the following scenarios:
- Booking a course: Try booking different types of courses to ensure all services display correctly and availability updates in real time.
- Payments: Make sure payments are processed smoothly for each payment method you’ve enabled.
- Cancellations: Ensure that clients can cancel or reschedule their bookings easily, and that notifications are sent appropriately.
- Notifications: Check all email and SMS notifications to make sure they’re triggered correctly and contain the right information.
This full test run will help you catch any minor issues and fine-tune the system before it goes live.
Staff Training
Before launching, make sure your team is familiar with the booking system. Even though the plugin handles most of the work, your staff should know how to:
- View and manage bookings from the dashboard.
- Reschedule or cancel appointments if needed.
- Use calendar synchronization to stay on top of their schedule.
Once everyone is comfortable with the system, it’s time to go live!
10. Monitoring and Optimizing the Booking System
After launching the booking system, it’s important to monitor its performance and make any necessary adjustments.
Tracking Performance
Most booking plugins offer reporting features that let you track important metrics, like the number of bookings per day, week, or month. For Siren Training, this can help identify peak times for certain courses, as well as track revenue from bookings.
Additionally, keeping an eye on customer feedback (e.g., asking for feedback after each training session) can highlight areas where the booking process can be improved.
Ongoing Maintenance
WordPress and its plugins are frequently updated, so make sure to keep everything up-to-date to avoid security vulnerabilities and compatibility issues. Periodically review your services, pricing, and staff availability to ensure that your booking system always reflects your current business needs.
Conclusion
And that’s it! By following these steps, Siren Training will have a fully functioning booking system that simplifies both client scheduling and staff management. The key is in choosing the right plugin, configuring it to match your business needs, and ensuring a smooth user experience for both clients and staff. Now, Siren Training’s clients can easily book Mental Health First Aid Courses or Neurodiversity Workshops, leaving your team free to focus on what they do best—delivering top-notch training sessions.
Let us know at FluxCMS if you need any further assistance, and we’ll be happy to help!